How to use Arduino as AVR
programmer
Atmega series Micro controllers have several benefits like its open source, easy to use, available in a large different types, cheap and most important one, it is easy to begin. It have wide variety of boards available called arduino which are easy to start things. Specially if you are programmer and know a little about electrical then it is a blessing for you. Although it can help you to begin but these are not appropriate for Electrical engineers as they have a lot of essential things skipped or being done under the hood. But still it is of great help if you start with Arduino, so I come with a "cost effective" solution. Yeah! I find out a way to use Arduino programmer to program Atmega Micro controllers. So start with Arduino and slowly switch down to atmega. You don't need a stand alone programmer. So in short, 2 in 1 package.
>> Pre Requisites: Installed WinAVR and compiled hex file of the code
Step 1:
See
board configuration. Note Com port number and Programmer.
Step 2:
Choose
ArduinoISP from examples and burn it on Arduino.
Step 3:
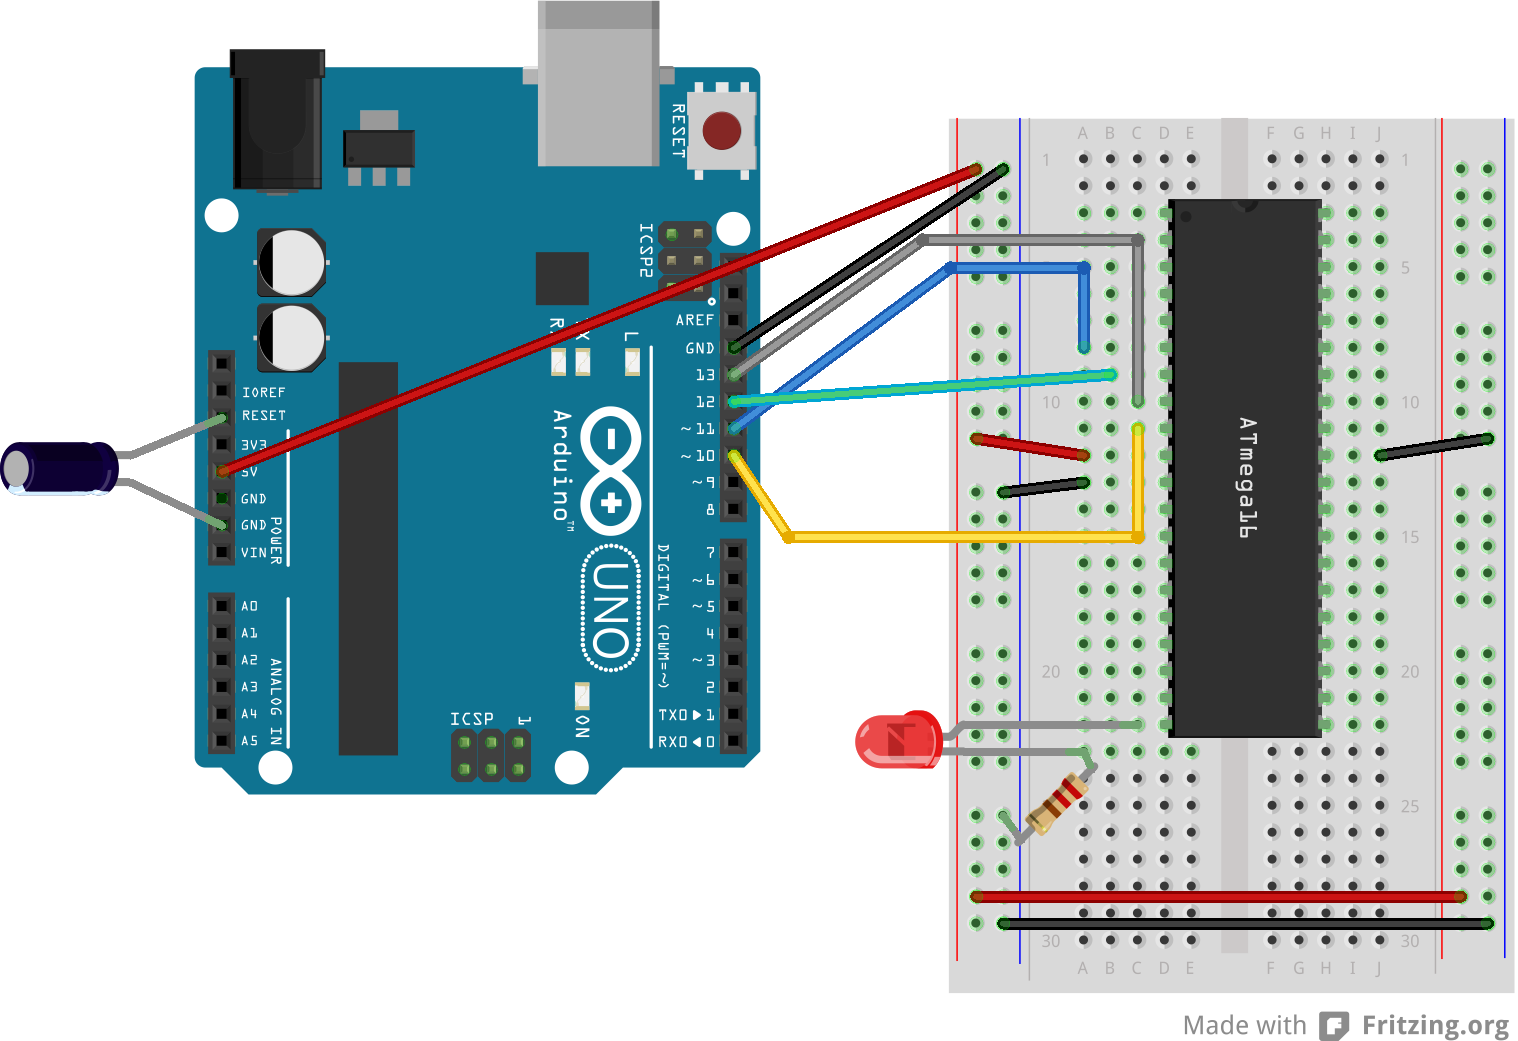
Connect circuit like this
pin
name: not-mega: mega(1280 and 2560)
slave
reset: 10: 53
MOSI: 11: 51
MISO: 12: 50
SCK: 13: 52
Step 4:
Open
command prompt and write AVRdude (It will be already installed if you have
installed WinAVR ) otherwise install it and open command prompt and write
following command…
avrdude
-p m8 -P com11 -c avrisp -b 19200
>> Here after –p
is name of Microcontroller.
Following
are atmegas and their name for avrdude command
Valid
parts are:
t10 =
ATtiny10
[C:\WinAVR-20100110\bin\avrdude.conf:15443]
t8 =
ATtiny9
[C:\WinAVR-20100110\bin\avrdude.conf:15403]
t5 =
ATtiny5 [C:\WinAVR-20100110\bin\avrdude.conf:15363]
t4 =
ATtiny4
[C:\WinAVR-20100110\bin\avrdude.conf:15323]
ucr2 = 32UC3A0512
[C:\WinAVR-20100110\bin\avrdude.conf:15302]
x128a4 = ATXMEGA128A4 [C:\WinAVR-20100110\bin\avrdude.conf:15204]
x64a4 = ATXMEGA64A4
[C:\WinAVR-20100110\bin\avrdude.conf:15107]
x32a4 = ATXMEGA32A4
[C:\WinAVR-20100110\bin\avrdude.conf:15010]
x16a4 = ATXMEGA16A4
[C:\WinAVR-20100110\bin\avrdude.conf:14913]
x256a3b = ATXMEGA256A3B [C:\WinAVR-20100110\bin\avrdude.conf:14816]
x256a3 = ATXMEGA256A3 [C:\WinAVR-20100110\bin\avrdude.conf:14719]
x192a3 = ATXMEGA192A3 [C:\WinAVR-20100110\bin\avrdude.conf:14622]
x128a3 = ATXMEGA128A3 [C:\WinAVR-20100110\bin\avrdude.conf:14525]
x64a3 = ATXMEGA64A3 [C:\WinAVR-20100110\bin\avrdude.conf:14428]
x256a1 = ATXMEGA256A1 [C:\WinAVR-20100110\bin\avrdude.conf:14331]
x192a1 = ATXMEGA192A1 [C:\WinAVR-20100110\bin\avrdude.conf:14234]
x128a1d = ATXMEGA128A1REVD
[C:\WinAVR-20100110\bin\avrdude.conf:14137]
x128a1 = ATXMEGA128A1 [C:\WinAVR-20100110\bin\avrdude.conf:14040]
x64a1 = ATXMEGA64A1
[C:\WinAVR-20100110\bin\avrdude.conf:13943]
m6450 = ATMEGA6450
[C:\WinAVR-20100110\bin\avrdude.conf:13754]
m3250 = ATMEGA3250
[C:\WinAVR-20100110\bin\avrdude.conf:13565]
m645 = ATMEGA645
[C:\WinAVR-20100110\bin\avrdude.conf:13376]
m325 = ATMEGA325
[C:\WinAVR-20100110\bin\avrdude.conf:13187]
usb82 = AT90USB82 [C:\WinAVR-20100110\bin\avrdude.conf:13007]
usb162 = AT90USB162
[C:\WinAVR-20100110\bin\avrdude.conf:12823]
usb1287 = AT90USB1287
[C:\WinAVR-20100110\bin\avrdude.conf:12634]
usb1286 = AT90USB1286
[C:\WinAVR-20100110\bin\avrdude.conf:12445]
usb647 = AT90USB647
[C:\WinAVR-20100110\bin\avrdude.conf:12257]
usb646 = AT90USB646
[C:\WinAVR-20100110\bin\avrdude.conf:12068]
m32u4 = ATmega32U4
[C:\WinAVR-20100110\bin\avrdude.conf:11880]
t84 =
ATtiny84
[C:\WinAVR-20100110\bin\avrdude.conf:11697]
t44 =
ATtiny44
[C:\WinAVR-20100110\bin\avrdude.conf:11515]
t24 =
ATtiny24
[C:\WinAVR-20100110\bin\avrdude.conf:11333]
m128rfa1 = ATMEGA128RFA1 [C:\WinAVR-20100110\bin\avrdude.conf:11145]
m2561 = ATMEGA2561 [C:\WinAVR-20100110\bin\avrdude.conf:10951]
m2560 = ATMEGA2560
[C:\WinAVR-20100110\bin\avrdude.conf:10758]
m1281 = ATMEGA1281
[C:\WinAVR-20100110\bin\avrdude.conf:10570]
m1280 = ATMEGA1280
[C:\WinAVR-20100110\bin\avrdude.conf:10381]
m640 = ATMEGA640
[C:\WinAVR-20100110\bin\avrdude.conf:10193]
t85 =
ATtiny85
[C:\WinAVR-20100110\bin\avrdude.conf:10012]
t45 =
ATtiny45
[C:\WinAVR-20100110\bin\avrdude.conf:9833]
t25 =
ATtiny25
[C:\WinAVR-20100110\bin\avrdude.conf:9653]
pwm3b = AT90PWM3B
[C:\WinAVR-20100110\bin\avrdude.conf:9472]
pwm2b = AT90PWM2B
[C:\WinAVR-20100110\bin\avrdude.conf:9289]
pwm3 = AT90PWM3
[C:\WinAVR-20100110\bin\avrdude.conf:9106]
pwm2 = AT90PWM2 [C:\WinAVR-20100110\bin\avrdude.conf:8922]
t2313 = ATtiny2313
[C:\WinAVR-20100110\bin\avrdude.conf:8735]
m328p = ATMEGA328P
[C:\WinAVR-20100110\bin\avrdude.conf:8547]
t88 =
attiny88
[C:\WinAVR-20100110\bin\avrdude.conf:8361]
m168 = ATMEGA168
[C:\WinAVR-20100110\bin\avrdude.conf:8173]
m88 =
ATMEGA88
[C:\WinAVR-20100110\bin\avrdude.conf:7987]
m48 =
ATMEGA48
[C:\WinAVR-20100110\bin\avrdude.conf:7800]
t861 = ATTINY861 [C:\WinAVR-20100110\bin\avrdude.conf:7612]
t461 = ATTINY461
[C:\WinAVR-20100110\bin\avrdude.conf:7423]
t261 = ATTINY261
[C:\WinAVR-20100110\bin\avrdude.conf:7234]
t26 =
ATTINY26
[C:\WinAVR-20100110\bin\avrdude.conf:7077]
m8535 = ATMEGA8535 [C:\WinAVR-20100110\bin\avrdude.conf:6919]
m8515 = ATMEGA8515
[C:\WinAVR-20100110\bin\avrdude.conf:6761]
m8 =
ATMEGA8
[C:\WinAVR-20100110\bin\avrdude.conf:6600]
m161 = ATMEGA161
[C:\WinAVR-20100110\bin\avrdude.conf:6460]
m32 =
ATMEGA32 [C:\WinAVR-20100110\bin\avrdude.conf:6285]
m6490 = ATMEGA6490
[C:\WinAVR-20100110\bin\avrdude.conf:6092]
m649 = ATMEGA649
[C:\WinAVR-20100110\bin\avrdude.conf:5907]
m3290p = ATMEGA3290P [C:\WinAVR-20100110\bin\avrdude.conf:5724]
m3290 = ATMEGA3290
[C:\WinAVR-20100110\bin\avrdude.conf:5539]
m329p = ATMEGA329P
[C:\WinAVR-20100110\bin\avrdude.conf:5354]
m329 = ATMEGA329
[C:\WinAVR-20100110\bin\avrdude.conf:5170]
m169 = ATMEGA169 [C:\WinAVR-20100110\bin\avrdude.conf:4990]
m163 = ATMEGA163
[C:\WinAVR-20100110\bin\avrdude.conf:4832]
m162 = ATMEGA162
[C:\WinAVR-20100110\bin\avrdude.conf:4636]
m1284p = ATMEGA1284P [C:\WinAVR-20100110\bin\avrdude.conf:4446]
m644p = ATMEGA644P [C:\WinAVR-20100110\bin\avrdude.conf:4254]
m644 = ATMEGA644
[C:\WinAVR-20100110\bin\avrdude.conf:4064]
m324p = ATMEGA324P
[C:\WinAVR-20100110\bin\avrdude.conf:3873]
m164p = ATMEGA164P
[C:\WinAVR-20100110\bin\avrdude.conf:3682]
m16 =
ATMEGA16
[C:\WinAVR-20100110\bin\avrdude.conf:3504]
c32 =
AT90CAN32
[C:\WinAVR-20100110\bin\avrdude.conf:3313]
c64 =
AT90CAN64
[C:\WinAVR-20100110\bin\avrdude.conf:3123]
c128 = AT90CAN128 [C:\WinAVR-20100110\bin\avrdude.conf:2933]
m128 = ATMEGA128
[C:\WinAVR-20100110\bin\avrdude.conf:2755]
m64 =
ATMEGA64
[C:\WinAVR-20100110\bin\avrdude.conf:2574]
m103 = ATMEGA103
[C:\WinAVR-20100110\bin\avrdude.conf:2434]
8535 = AT90S8535 [C:\WinAVR-20100110\bin\avrdude.conf:2313]
8515 = AT90S8515
[C:\WinAVR-20100110\bin\avrdude.conf:2199]
4434 = AT90S4434
[C:\WinAVR-20100110\bin\avrdude.conf:2116]
4433 = AT90S4433
[C:\WinAVR-20100110\bin\avrdude.conf:1992]
2343 = AT90S2343 [C:\WinAVR-20100110\bin\avrdude.conf:1868]
2333 = AT90S2333
[C:\WinAVR-20100110\bin\avrdude.conf:1740]
2313 = AT90S2313
[C:\WinAVR-20100110\bin\avrdude.conf:1627]
4414 = AT90S4414
[C:\WinAVR-20100110\bin\avrdude.conf:1514]
1200 = AT90S1200
[C:\WinAVR-20100110\bin\avrdude.conf:1399]
t15 =
ATtiny15
[C:\WinAVR-20100110\bin\avrdude.conf:1266]
t13 =
ATtiny13
[C:\WinAVR-20100110\bin\avrdude.conf:1093]
t12 =
ATtiny12
[C:\WinAVR-20100110\bin\avrdude.conf:960]
t11 =
ATtiny11
[C:\WinAVR-20100110\bin\avrdude.conf:896]
>>
Then after –P are name of com port on
which your Arduino is connected.
>>After
–c is name of compiler which in this
case is avrisp or you can also Arduino
If
screen like following appears then it means your Arduino is ready to use like
programmer..
Now you
can burn your code using following command
$
avrdude -p m8 -P com11 -c avrisp -b 19200 -U flash:w:main.hex
Possible errors:
1)Device
signature not found. Once it was 0 ×ffffff which is possibly due to dead chip and another time it was 0 ×00000 possibly due to external or internal oscillator